
Have you ever needed a 3D model of a real-world object but were put off by the high cost of traditional 3D scanners? For many, accessing professional-grade 3D scanning technology feels out of reach. Bulky and expensive dedicated scanners are often required to capture the intricate details of physical objects and convert them into digital 3D models. However, there’s an innovative and surprisingly accessible alternative: using a 3d Scanning Tool From Photos, also known as photogrammetry. This method allows you to create detailed 3D models using just a camera and specialized software, opening up a world of possibilities for hobbyists and professionals alike, especially in fields like automotive repair where digitizing parts can be incredibly useful.
Understanding Photogrammetry: Your 3D Scanning Tool from Photos
Photogrammetry, sometimes referred to as Structure from Motion (SFM), is a fascinating process that transforms 2D photographs into 3D spatial data. In simpler terms, it’s a 3d scanning tool from photos that estimates the three-dimensional positions of points on an object’s surface. It achieves this by analyzing multiple photographs of the object taken from various viewpoints. Imagine capturing an object from every angle imaginable; photogrammetry software then acts like a digital detective, identifying common features across these images. By understanding how these features shift from photo to photo, the software can calculate the camera’s position and orientation for each shot. This information is then used to reconstruct a 3D point cloud representing the object’s shape. While the raw output is often a point cloud, this data can be further processed to create a fully formed 3D mesh. Manual mesh creation from the point cloud often yields superior and more accurate results compared to automated meshing.
Essential Software for Photogrammetry: Free Tools at Your Fingertips
The landscape of photogrammetry software is vast, but it doesn’t have to be expensive. While professional, feature-rich software exists, numerous free options are remarkably powerful, making photogrammetry accessible to everyone. However, many of these cost-effective options can serve effectively as your 3d scanning tool from photos.
When choosing software, consider these excellent free options:
- Colmap: A robust and highly regarded open-source software, Colmap excels at reconstruction and is widely used in the photogrammetry community. It’s known for its accuracy and ability to handle large datasets, though it often performs best with NVIDIA CUDA-enabled GPUs.
- Meshroom: Another popular free and open-source choice, Meshroom offers a user-friendly node-based interface, making the photogrammetry workflow visually intuitive. It’s a great option for beginners and experienced users alike.
For post-processing your 3D data, MeshLab is an indispensable free and open-source tool. MeshLab is ideal for cleaning up point clouds and meshes, smoothing surfaces, and converting file formats, ensuring your 3d scanning tool from photos workflow is complete from capture to refinement.
Keep in mind that photogrammetry processing can be demanding on your computer’s hardware. While basic reconstructions might run on older laptops, complex projects with many photos will benefit significantly from a more powerful CPU and, ideally, a dedicated GPU. Some software, like Colmap, leverages NVIDIA CUDA for faster processing, which is a consideration if you have an NVIDIA graphics card.
Capturing the Perfect Photos for Your 3D Scan
The quality of your 3D model is directly tied to the quality of your input photos. Think of your camera as the core of your 3d scanning tool from photos setup. While a professional DSLR camera offers advantages, even a modern smartphone camera can produce excellent results for photogrammetry. If using a DSLR, setting the aperture to f/8 or higher is recommended to maximize sharpness and depth of field.
Aim to capture at least 20 photos, and often more, to ensure comprehensive coverage of your object. In practice, shooting 50-80 photos is common to capture intricate details effectively. Remember, it’s better to have too many photos than too few, as software can discard images that don’t contribute to the reconstruction.
Here are key guidelines for capturing photos for photogrammetry, essential for maximizing the effectiveness of your 3d scanning tool from photos:
- Circle the Object: Walk around your object in a circular path as you take photos. Crucially, keep the object and its surroundings stationary between shots.
- Overlap is Key: Ensure significant overlap between consecutive photos. Each part of the object should be visible in at least two photos, ideally with a 60-80% overlap between each image and the next.
- Diffuse Lighting is Best: Avoid harsh shadows. Opt for soft, diffuse lighting, like taking photos outdoors on a cloudy day or in a well-lit indoor space with diffused light.
- Object Proximity: Position the object so that it occupies a significant portion of each image frame. This ensures the software has ample detail to work with.
- Avoid Movement: Moving objects (or people) in the scene will disrupt the reconstruction process. Ensure a static environment.
- Matte Surfaces Preferred: Glossy or transparent surfaces can be challenging for photogrammetry due to reflections. (More on this in the tips section below).
Textured or rough objects, like statues or car parts with some surface wear, are ideal candidates for photogrammetry. For glossy or transparent objects, consider temporarily applying a matte coating like flour powder or painter’s tape to improve scan quality. Advanced users can also extract frames from videos, but ensure a fast shutter speed (e.g., 1/80s) to minimize motion blur.
Step-by-Step Guide: Reconstructing Geometry from Your Photos
Let’s walk through the process of using Colmap, a powerful free software, to reconstruct a 3D model from your photos. This step turns your photo collection into a usable 3D scan, the core function of your 3d scanning tool from photos.
- Organize Your Files: Create a dedicated folder for each scan project. Inside, create a subfolder named “Photos” and place all your captured images within it. Delete any blurry or unusable photos at this stage.
- Launch Colmap: Open Colmap by running the
Colmap.batfile. - Automatic Reconstruction: Navigate to Reconstruction > Automatic reconstruction in the top menu.
- Set Workspace Folder: Choose a Workspace folder to store Colmap’s processing files and output. Create a new folder next to your “Photos” folder for this purpose.
- Specify Image Folder: Set the Image folder to the “Photos” folder containing your images.
- Vocabulary Tree (Optional): You can leave the Vocabulary tree empty or download one from the Colmap download page for potentially improved performance.
- Data Type: Select Individual images unless you are using video frames.
- Quality Setting: Choose Medium quality to start. While High quality can yield better results, it can also be more prone to crashes, especially on less powerful systems.
- Run Reconstruction: Leave other settings at their defaults and click Run.
- Processing Time: The reconstruction time varies based on the number of photos and your computer’s specifications, ranging from minutes to potentially hours.
Once Colmap completes the reconstruction, you’ll see a 3D visualization of the reconstructed scene, along with the estimated camera positions.
Colmap set-up and finished view of the reconstructed scene
Understanding Colmap Output: Point Clouds and Meshes
Colmap produces several output files, but the two most important for our 3d scanning tool from photos process are fused.ply and meshed.ply. These files are located in a subfolder within your workspace folder, typically Workspace folder/dense/0/.
- meshed.ply: This file is an automatically generated 3D mesh. While convenient, Colmap’s automatic meshing isn’t always optimal. However, it can be a usable starting point for simpler models or when quick results are needed. You can easily convert PLY files to STL format (for 3D printing) using software like MeshMixer or MeshLab. However, directly printing this mesh is often not recommended due to potential errors and a lack of a flat base for print bed adhesion. Consider using guides on repairing 3D models and cutting models to prepare the mesh for printing. Also, note that the scale of the scanned object will be arbitrary and needs adjustment.
- fused.ply: This file contains a point cloud, a collection of 3D points representing the scanned object’s surface. It’s not a mesh yet, but it offers more flexibility for creating a high-quality mesh manually. Creating a mesh from the point cloud takes extra effort but generally results in a cleaner and more accurate 3D model.
Creating a Mesh from Point Cloud Data with MeshLab
For finer control over your final 3D model, creating a mesh from the fused.ply point cloud in MeshLab is the preferred approach for a truly effective 3d scanning tool from photos workflow.
- Import Point Cloud: Open MeshLab, go to File > Import Mesh, and select your
fused.plyfile. - Visualize Point Cloud: You’ll see the 3D point cloud representing your scanned scene.
- Vertex Selection: Choose the Select vertexes tool from the toolbar. Use it to box-select and highlight points you want to remove (e.g., background points). Hold Ctrl to add to your selection.
- Delete Vertices: Click the Delete vertices button in the toolbar to remove selected points.
- Repeat Cleaning: Repeat steps 3 and 4 until only the points representing your object remain.
- Poisson Surface Reconstruction: Go to Filters > Remeshing, Simplification and Reconstruction > Screened Poisson Surface Reconstruction.
- Reconstruction Depth: Adjust the Reconstruction Depth parameter. Values between 13-15 often provide a good balance of detail and processing time. Experiment with other settings as needed.
- Apply Reconstruction: Click Apply to generate the mesh.
- Clean Up Mesh Edges: Use the Select in triangular region and Delete faces tools to remove any unwanted mesh artifacts or extraneous geometry around the edges of your model.
- Export Mesh: Go to File > Export Mesh. Choose a format: PLY, 3DS, or OBJ to preserve texture information, or STL for 3D printing.
Tips to Enhance Your 3D Scans
To further refine your 3D models and address common photogrammetry challenges, consider these tips to maximize the potential of your 3d scanning tool from photos:
- Smoothing: Use Filters > Smoothing, Fairing and Deformation > Laplacian Smooth to smooth out minor surface imperfections. Experiment with Smoothing steps values (8-15 is a good starting range). Be careful not to over-smooth and lose details.
- Face Selection by Edge Length: Remove extraneous faces generated during reconstruction using Filters > Selection > Select Faces with edges longer than…. Use preview to adjust the Edge threshold to select unwanted faces for deletion.
- Decimation: Reduce the polygon count of overly dense meshes with Filters > Smoothing, Fairing and Deformation > Quadric Edge Collapse Decimation. Set a target number of faces (e.g., under 1 million, often 100k faces are sufficient).
Photogrammetry in Action: Real-World Examples
Scanning Statues: Ideal Subjects
Statues are excellent candidates for photogrammetry. Their matte surfaces, intricate details, and often large size make them well-suited for this 3d scanning tool from photos approach. Traditional 3D scanners struggle with large outdoor objects, but photogrammetry excels. When scanning outdoor statues, be mindful of moving people and try to shoot on overcast days to avoid harsh shadows.
The Sitting Woman statue by Václav Bejček from 1967, reconstructed into a 3D model using photogrammetry, and a 3D printed version.
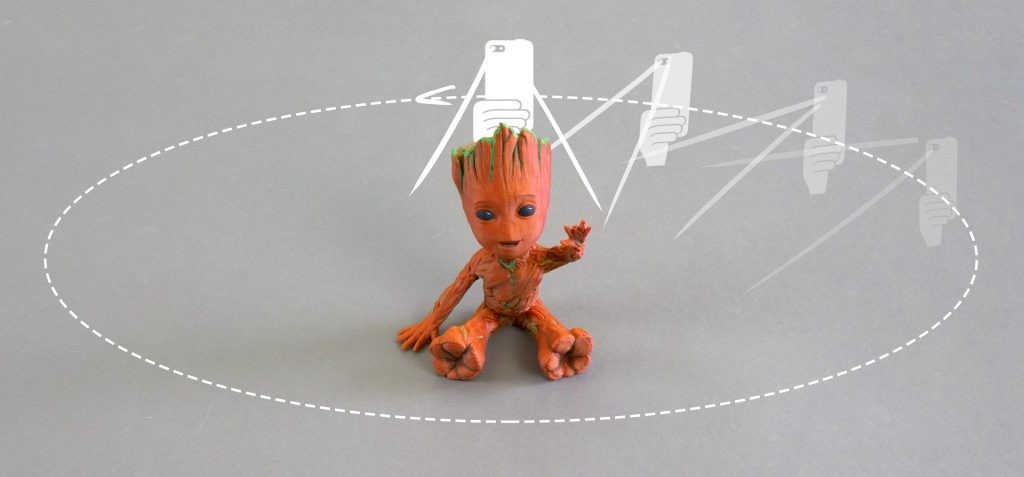
Baby Groot Benchmark: Testing Accuracy
Scanning a 3D print using photogrammetry might seem redundant since the original STL file exists. However, it serves as a valuable benchmark to assess the accuracy of this 3d scanning tool from photos technique. It also allows capturing hand-painted textures for digital preservation. While some geometric detail is lost compared to the original STL, photogrammetry effectively reconstructs key features and textures, making it a viable method for digitizing painted 3D prints.
Ping Pong Paddle: Overcoming Glossy Surfaces
Scanning a ping pong paddle highlights the challenge of glossy surfaces. The smooth, reflective surfaces lack features for the software to track, leading to incomplete reconstructions. The solution? Painter’s tape. Applying matte tape to glossy areas provides texture and diffuses reflections, enabling successful scanning. This simple trick is crucial for expanding the range of objects you can digitize with your 3d scanning tool from photos.
Glassware: Addressing Transparency
Transparent objects like glassware pose similar challenges to glossy surfaces. While sharp edges might be captured, smooth transparent areas are often missed, resulting in incomplete data. Again, applying painter’s tape or a temporary matte coating (like water-soluble paint) can make glass scannable with photogrammetry.
Conclusion: Photogrammetry as a Powerful and Accessible 3D Scanning Solution
Photogrammetry, using photos as a 3d scanning tool from photos, offers a compelling alternative to expensive traditional 3D scanners. It empowers you to digitize large objects, outdoor scenes, and intricate details with readily available equipment – a camera and a computer. It’s an affordable and accessible method, often requiring tools you already own. From scanning statues and art to potentially digitizing car parts for repair or customization, the applications are vast.
Is photogrammetry a viable 3D scanning tool? Absolutely YES. Will the raw scans be perfect? Probably not. Like all 3D scanning techniques, photogrammetry-generated meshes may require post-processing to fix imperfections, smooth surfaces, and optimize them for 3D printing or other applications. However, with free software and a bit of practice, you can harness the power of photogrammetry to create impressive 3D models from your photos, unlocking a world of creative and practical possibilities.
Sources
Schonberger, Johannes Lutz and Frahm, Jan-Michael, Structure-from-Motion Revisited. University of North Carolina at Chapel Hill, Eidgenossische Technische Hochschule Zurich.
All3DP – Autodesk 123D Catch Review