
In today’s connected world, your home Wi-Fi network is the gateway to your digital life. It’s crucial to ensure it’s secure from vulnerabilities and unauthorized access. The Avast Wifi Inspector Scan Tool is designed to do just that – thoroughly examine your network for weaknesses and potential security threats. This guide will walk you through how to use this powerful tool to safeguard your personal data and devices.
Understanding the Importance of Wi-Fi Security Scans
Before diving into the “how-to,” it’s important to understand the “why.” A compromised Wi-Fi network can expose you to numerous risks. Hackers can exploit vulnerabilities to:
- Steal personal data: Access your passwords, financial information, and browsing history.
- Install malware: Infect your devices with viruses, ransomware, and spyware.
- Use your internet connection for illegal activities: Leaving you potentially liable.
- Spy on your online activity: Monitor your emails, messages, and web browsing.
- Access connected devices: Control smart home devices, cameras, and computers on your network.
Regularly scanning your Wi-Fi network with a tool like Avast WiFi Inspector is a proactive step in preventing these threats and maintaining a secure digital environment.
How to Run a Wi-Fi Network Scan with Avast WiFi Inspector
Avast WiFi Inspector is integrated into Avast Antivirus, making it easily accessible for existing users. The process is straightforward for both Windows and macOS users.
Scanning Your Network on Windows
-
Open Avast Antivirus: Locate the Avast Antivirus icon on your desktop or in the system tray and open the application.
-
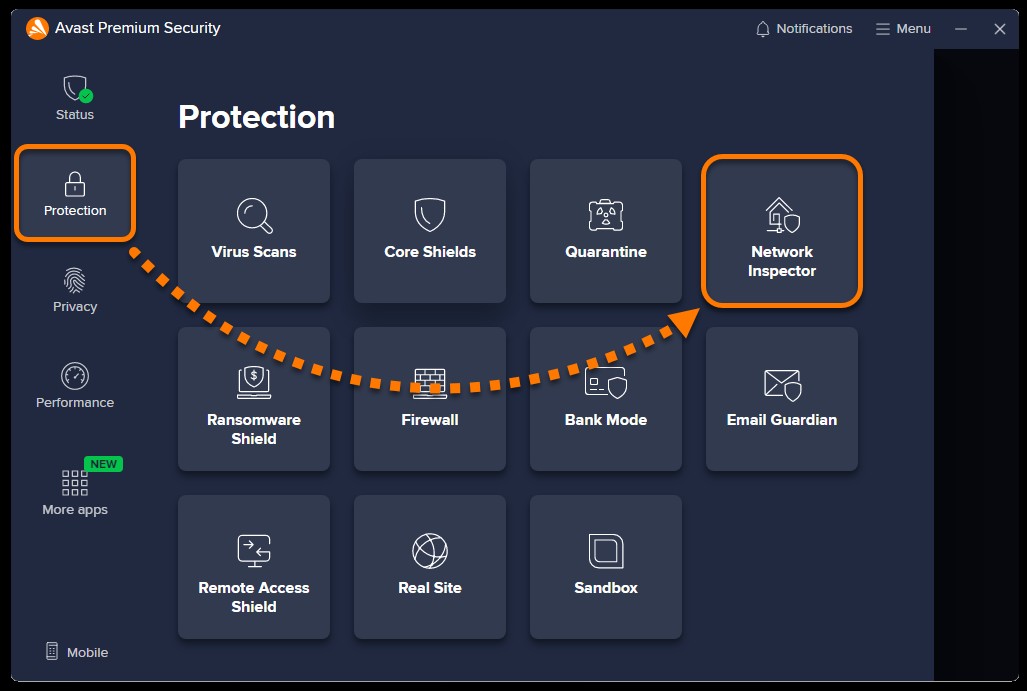
Navigate to Network Inspector: Click on the “Protection” tab in the main menu, and then select “Network Inspector.”
-
Initiate the Scan: Click the “Scan network” button to start the vulnerability scan of your current Wi-Fi network. Ensure you disable any VPN connections before initiating the scan, as VPNs can interfere with network analysis.
-
Wait for the Scan to Complete: Avast WiFi Inspector will now analyze your network for potential vulnerabilities. This process may take a few minutes.
-
Review Scan Results: Once the scan is complete, you’ll see one of two messages:
-
“No problems found on network”: This indicates that Avast WiFi Inspector did not detect any security issues or vulnerabilities on your network. Click “Finish” to close the scan results. If you are on a private network, you have the option to “Scan all devices” for a more comprehensive check.
-
“Problem(s) found” / “Issue(s) found”: This message indicates that Avast WiFi Inspector has identified vulnerabilities or security issues within your network. Proceed to the next section, “Resolving Detected Issues,” for guidance.
-
Scanning Your Network on macOS
-
Open Avast Security: Open the Avast Security application on your Mac.
-
Access Network Inspector: Click the “Network Inspector” tile within the Avast Security interface.
-
Start the Scan: Click “Scan network” to initiate the Wi-Fi network scan. On macOS Sonoma, you might be prompted to enable Location Services. Click “See how” and follow the on-screen instructions to enable this if required, as it’s necessary for network scanning on newer macOS versions.
-
Wait for Scan Completion: Allow Network Inspector to scan your Wi-Fi network for vulnerabilities.
-
Review Results: After the scan, you’ll receive one of these messages:
-
“No problems found on network”: No vulnerabilities were detected. Click “Done” to finish. You can also choose “Scan all devices” to check all connected devices on a private network.
-
“Vulnerable device(s) found” / “Problems found”: Security issues were detected. Proceed to the “Resolving Detected Issues” section.
-
Resolving Issues Detected by Network Inspector
If Avast WiFi Inspector identifies vulnerabilities, it’s crucial to address them promptly. The tool provides guidance to help you secure your network.
Fixing Issues on Windows
-
Click “Fix issues”: If vulnerabilities are found, the results screen will display a “Fix issues” button. Click this button to begin the resolution process.
-
Scan All Devices (Optional): You may be prompted to “Scan all devices” to ensure all devices connected to your network are checked for vulnerabilities. Click “Scan all devices” to initiate this comprehensive scan.
-
Grant Network Management Permission: If prompted with “permission to manage the network,” ensure you are connected to a trusted home or private network and select “Yes, continue.” This allows Avast to properly assess and secure your network.
-
Wait for Device Scan: Network Inspector will scan all devices on your network for vulnerabilities.
-
Secure Your Connection: Click “Fix issues” again to implement recommended solutions. Follow the on-screen instructions provided by Avast. Alternatively, you can expand the drop-down arrow on each device panel to view and fix individual vulnerabilities for each device.
-
Rescan Network: After applying the fixes, click “Rescan network” on the main Network Inspector screen to run another scan and confirm that the vulnerabilities have been successfully resolved.
-
Complete Resolution: Once all vulnerabilities are resolved, click “Done.”
-
Enable Additional Options (Optional): You can optionally enable “scan all devices” and “monitor this network” for ongoing protection. Then, click “Done” to finalize the process.
Alternative Issue Resolution (Windows – Public Networks):
If you are on a public network and issues are detected, Avast may recommend enabling a VPN for enhanced security.
-
Click “Fix issues”: As before, click “Fix issues” on the results screen.
-
Enable VPN: Avast may suggest enabling a VPN, such as Avast SecureLine VPN, to secure your device on the public network. Click “Turn On VPN” to activate a VPN connection (you may need to have Avast SecureLine VPN installed).
Fixing Issues on macOS
The process for resolving issues on macOS is similar to Windows.
-
Select “Scan all devices”: After a scan detects issues, select “Scan all devices” to check all connected devices.
-
Grant Network Management Permission: If prompted, confirm you are on a home or private network and select “Yes, continue” to allow network management.
-
Wait for Device Scan: Allow Network Inspector to scan your devices.
-
Secure Connection: Select “Fix issues” and follow the on-screen instructions to resolve vulnerabilities. You can also expand device panels to address individual vulnerabilities.
-
Rescan Network: Click “Rescan network” to perform another scan and verify the fixes.
-
Complete and Monitor (Optional): Once resolved, optionally enable “Monitor my network in real-time” for continuous monitoring, and then click “Done.”
Alternative Security Measure (macOS – Public Networks):
Similar to Windows, Avast may recommend using a VPN on public networks.
-
Enable VPN: After scanning a public network, Avast might suggest using Avast SecureLine VPN to enhance your security.
Advanced Features: Scan All Devices and Monitor Network
Avast WiFi Inspector offers advanced features for enhanced network security management.
Scan All Devices (Windows)
To enable scanning of all devices on your network:
-
Navigate to Network Inspector: Open Avast Antivirus and go to “Protection” -> “Network Inspector.”
-
Enable “Scan all devices”: Click the toggle in the “Scan all devices” panel to switch it from gray (OFF) to green (ON).
-
Grant Network Management Permission: If prompted, confirm you are on a home or private network and select “Yes, continue.”
-
Enable “Monitor this network” (Optional): You can also enable “Monitor this network” by toggling the switch to green (ON) for real-time network monitoring.
With “Scan all devices” enabled, Network Inspector will scan every device connected to your network and notify you when new devices join. You can disable these features by toggling the switches back to gray (OFF).
Manage Home Network (macOS)
On macOS, managing “Scan all devices” and network monitoring is done through network settings:
-
Navigate to Network Inspector Settings: Open Avast Security, go to “Network Inspector,” and click the gear icon (Settings) in the top-right corner.
-
Enable Home Network: In the settings, locate your network panel and click the toggle under “Home network” to switch it from red (OFF) to green (ON).
-
Grant Network Management Permission: If prompted, confirm you are on a home or private network and select “Yes, continue.”
-
Enable “Monitor” (Optional): Click “…” More options (the three dots) and select “Monitor” to enable real-time network monitoring (available with Avast Premium Security subscription).
You can disable these features by toggling the switches back to their OFF positions.
Managing Network Inspector Settings
Both Windows and macOS versions of Avast WiFi Inspector allow you to customize its behavior through settings.
Accessing Settings
-
Navigate to Network Inspector: Open Avast Antivirus/Security and go to “Protection” -> “Network Inspector” (Windows) or click the “Network Inspector” tile (macOS).
-
Open Settings: Click the gear icon (Settings) in the top-right corner of the Network Inspector screen.
Available Settings
In the settings menu, you can modify the following options by ticking or unticking the checkboxes:
Windows Settings:
-
Scan new networks automatically: Automatically scans new networks you connect to for security risks.
-
Notify me about new network scan progress: Sends notifications about the progress of network scans.
-
Rescan networks automatically: Regularly rescans known networks to check for security.
-
Test network devices for weak passwords: Regularly checks passwords for network devices to ensure they are strong.
macOS Settings:
-
Ask me to scan new networks: Prompts you to scan new networks when you join them for the first time.
-
Check devices for weak passwords: Regularly inspects passwords to ensure they are strong and secure.
Customize these settings to align with your security preferences and network environment.
Conclusion
The Avast WiFi Inspector scan tool is an invaluable asset for anyone wanting to proactively manage their home network security. By regularly scanning your network and devices, you can identify and resolve vulnerabilities before they are exploited by cyber threats. Whether you are using Windows or macOS, Avast provides a user-friendly interface and clear instructions to help you keep your Wi-Fi network safe and secure. Take advantage of this powerful tool to protect your personal data and enjoy a safer online experience.