Maintaining your vehicle’s braking system is crucial for safety, and the Anti-lock Braking System (ABS) is a vital component. Bleeding the ABS module is a necessary procedure when air enters the system, often after repairs or fluid replacement. This guide will walk you through how to perform an ABS brake bleed using the Jscan Android app, a powerful scan tool that activates the ABS pump, making the process efficient and effective. This procedure, while requiring two people, is straightforward when following these detailed steps.
Performing an ABS Brake Bleed with Jscan: Step-by-Step
Before you begin, ensure you have the Jscan app installed on your Android device and connected to your vehicle via an OBD2 adapter. You’ll also need a partner to assist with the brake pedal, an 11mm wrench for front brakes, a 10mm wrench for rear brakes, a brake bleeder kit with clear tubing, and fresh brake fluid.
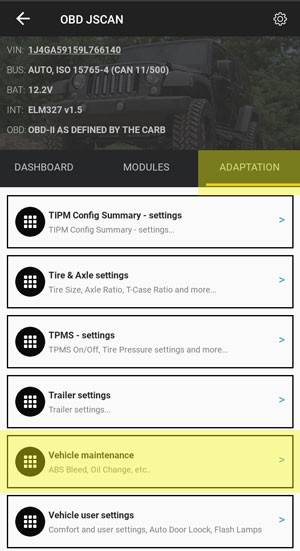
1. Navigate to the Adaptation Tab in Jscan
Once you’ve launched Jscan and connected to your vehicle, the first step is to locate the “Adaptation” tab within the app’s menu. This section houses various vehicle maintenance functions, including the ABS bleed procedure.
2. Select “Vehicle Maintenance”
Within the Adaptation tab, you will find a list of options. Scroll down until you see “Vehicle Maintenance” and select it. This may require scrolling as it is often located further down the list.
3. Choose “ABS Brake Pump Bleed”
In the Vehicle Maintenance menu, look for and select “ABS Brake Pump Bleed.” This specific function is designed to activate the ABS module and facilitate the bleeding process, ensuring air is purged from the entire system, including the ABS pump itself.
4. Acknowledge Warning Messages and Proceed
Jscan will display a series of warning messages before initiating the ABS bleed procedure. These warnings are crucial for safety and proper execution. Carefully read each message, ensuring you understand the instructions, and then press “Go” to proceed. These messages typically cover safety precautions and pre-setup checks.
5. Prepare the Brake Pedal
Instruct your assistant to press and hold down the brake pedal. If the pedal feels soft initially, have them quickly pump the brake pedal several times (3-5 pumps) to build pressure. This ensures a firm pedal for the ABS bleed process, maximizing the effectiveness of the procedure.
6. Start the ABS Brake Bleed Procedure
Press “Go” in the Jscan app to initiate the ABS brake bleed procedure. The app will activate the ABS module, and your assistant will feel the brake pedal pushing back upwards as the module cycles. This pumping action, occurring about four times in short bursts, is a key part of the process, forcing fluid and air through the ABS module.
Tip: ABS Module Sanity Check: This step serves as a useful check for your ABS module’s functionality. If you feel the pedal pulsing, it indicates the electronic and mechanical components of the module are responding. Lack of pulsation might suggest an issue with the ABS module, potentially requiring replacement. However, continue with the bleed to further diagnose.
7. Prepare to Bleed the Front Driver Side Brake
Move to the front driver’s side brake caliper with your 11mm wrench and brake bleeder tool. Be ready to open the bleeder valve shortly.
Important: Do NOT Open the Bleeder Valve Yet! Despite on-screen instructions that may appear later, it’s crucial not to open the bleeder valve at this stage. Prematurely opening the valve can reduce the procedure’s effectiveness.
8. Initiate Front Bleed with Jscan Activation
Press “Go” in the Jscan app. The app will display a “Test in Progress” screen, but no test is actively running at this moment. This is your cue to position your wrench on the bleeder valve and prepare to open it. Pressing “Go” again in the next step will immediately activate the ABS pump.
9. Open Front Bleeder Valve During ABS Pump Cycle
With your wrench on the bleeder valve, press “Go” again in Jscan. The app will now activate the ABS module, initiating four consecutive pump cycles, each lasting about 1.6 seconds.
Crucial Tip: Delay Bleeder Opening: Allow Jscan to perform the first pump cycle with the bleeder valve closed. This pressurizes the system, pushing air towards the bleeder valve. After the first pump, Jscan will show a countdown screen before the second pump.
10. Bleed During Subsequent Pump Cycles
As the second pump cycle begins, crack open the bleeder valve about half a turn. Observe the clear tubing of your brake bleeder tool for air bubbles exiting with the brake fluid. Keep the bleeder valve open during the remaining pump cycles (cycles 2, 3, and 4).
11. Close Front Bleeder Valve
Immediately after Jscan completes the fourth pump cycle and displays the “Close the front Bleeder Valve” screen, close the bleeder valve.
Diagnostic Tip: Observing fluid flow during steps 9 and 10 confirms that the three piston valves associated with this wheel in the ABS module are functioning correctly. Lack of fluid flow might indicate a potential ABS module issue.
12. Move to the Rear Driver Side Brake
Press “Go” in Jscan and move to the rear driver’s side wheel with your 10mm wrench and brake bleeder tool. Instruct your assistant to continue holding the brake pedal down.
13. Connect Bleeder Tool to Rear Bleeder Valve
Connect your brake bleeder tool to the rear driver’s side bleeder valve.
14. Prepare for Rear Bleed Activation
Jscan will display a screen similar to the front brake procedure, again prompting you NOT to open the bleeder valve yet.
15. Initiate Rear Bleed with Jscan Activation
Press “Go” in Jscan. The “Test in Progress” screen will appear. Position your wrench on the rear bleeder valve and prepare to open it. Pressing “Go” again will activate the ABS pump.
16. Open Rear Bleeder Valve During ABS Pump Cycle
Press “Go” again. Jscan will activate the ABS module and perform four pump cycles.
Tip: Delay Rear Bleeder Opening: For the rear brakes, wait for two pump cycles with the bleeder valve closed to pressurize the system effectively. After the second pump, Jscan will display a countdown screen.
17. Bleed During Subsequent Pump Cycles (Rear)
As the third pump cycle begins, crack open the rear bleeder valve half a turn and observe for air bubbles. Keep it open during the remaining cycles.
18. Close Rear Bleeder Valve
After the fourth pump cycle and when Jscan displays the “Close the Rear Bleeder Valve” screen, immediately close the rear bleeder valve. Similar to the front, fluid flow confirms piston valve function.
19. ABS Module Bleed Complete
Press “Go” in Jscan. The app will display the “ABS Module Bleed Complete” screen.
20. Repeat on Passenger Side
Congratulations! You’ve completed the ABS bleed on one side of your vehicle. However, the procedure needs to be repeated on the passenger side to ensure the entire ABS system is properly bled. Your assistant can now take a break from holding the brake pedal.
21. Top Off Brake Fluid
Finally, before moving to the passenger side, top off your brake fluid reservoir with fresh fluid, ensuring the level is just above the maximum line. Monitor the fluid level throughout the entire bleeding process to prevent air from being drawn back into the system, which would necessitate restarting the procedure.
By following these steps using the Jscan Android app and an OBD2 scan tool, you can effectively perform an ABS brake bleed, ensuring optimal braking performance and safety for your vehicle. This DIY approach saves time and money while empowering you to maintain your vehicle’s critical systems.