
Are you a proud owner of a modern, fuel-injected Vespa and encountering engine issues? You’re not alone. While online resources abound for older, carbureted Vespa models, information on diagnosing modern, injected engines can be scarce. The complexity of the Electronic Control Unit (ECU) in these newer Vespas often makes troubleshooting vague and frustrating. Fortunately, just like with other Italian motorcycles like Ducatis and Moto Guzzis, accessible diagnostic solutions exist for your Piaggio-manufactured Vespa.
This comprehensive guide will introduce you to the world of Vespa diagnostics and how you can use a Vespa Diagnostic Scan Tool to understand and resolve issues with your scooter. We’ll focus on using readily available, cost-effective software and hardware to empower you to perform your own diagnostics, just like a professional mechanic.
This tutorial is inspired by the methods used for other Italian bikes and tailored specifically for modern Vespa engines. We’ll be using IAWdiag, a user-friendly, freeware/donation-based program compatible with the Magneti Marelli MIU ECUs found in many injected Vespas. JPdiag is another excellent alternative, and while we’ll primarily focus on IAWdiag, the principles remain similar for both.
Is Your Vespa Compatible? Checking Your ECU
Before diving into the diagnostic process, it’s crucial to ensure compatibility between your Vespa’s ECU and the diagnostic software. The good news is that IAWdiag and JPdiag are designed to work with a wide range of Magneti Marelli MIU ECUs commonly found in modern Vespas.
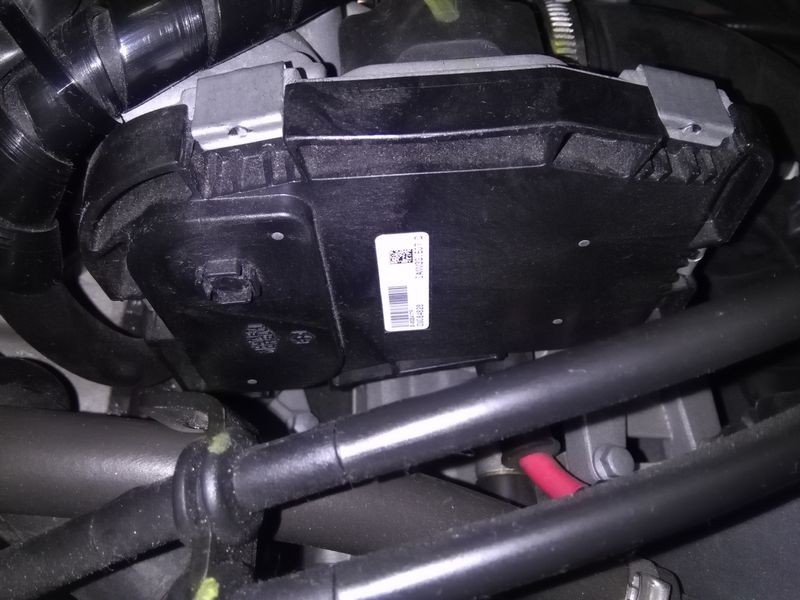
To check your ECU, locate the sticker on the side of your Vespa’s ECU unit. This sticker will clearly display the ECU type and serial number.
Refer to the compatible ECU list within IAWdiag (shown below). If your ECU model is listed, you’re in luck – IAWdiag should work seamlessly with your Vespa.
Building Your DIY Vespa Diagnostic Tool: What You’ll Need
Creating your own Vespa diagnostic scan tool setup is surprisingly straightforward and affordable. Here’s a list of the components you’ll need:
- Laptop or PC with Windows XP or later: No need for a high-powered machine. Older laptops running Windows XP or Windows 7 will work perfectly.
- VAG KKL Cable (FTDI Chip Preferred): This cable acts as the interface between your Vespa’s ECU and your computer. It’s crucial to choose a cable with an FTDI chipset for reliable communication. Avoid cheaper cables with CH340 chipsets as they can be problematic.
- Fiat OBD Cable: This cable adapts the VAG KKL cable to connect to your Vespa’s diagnostic port.
- Multimeter: A multimeter is useful for verifying the wiring of your Fiat OBD cable, ensuring correct connections and preventing potential ECU damage.
Choosing the Right VAG KKL Cable
When purchasing a VAG KKL cable, opt for one that explicitly states it uses an FTDI chipset. Many are available online from retailers like eBay and Amazon. Be cautious of very cheap options, as these often use the less reliable CH340 chipset.
A reliable VAG KKL cable, like the one pictured, will ensure smooth communication with your Vespa’s ECU.
Selecting the Fiat OBD Cable
The Fiat OBD cable typically comes with crocodile clips for connecting to a battery. This cable adapts the standard OBD-II connector of the VAG KKL cable to the specific connector used on your Vespa.
Crucial Wiring Check for the Fiat OBD Cable
Before connecting anything to your Vespa, it is absolutely vital to verify the wiring of your Fiat OBD cable. Incorrect wiring can lead to serious damage to your ECU. Use a multimeter to check the continuity and ensure the cable is wired according to the following scheme:
OBD Plug (Female) to FIAT Plug (Male):
- Pin 5 (GND) -> Pin 2 (GND)
- Pin 7 (K-line) -> Pin 3 (K-line)
- Pin 16 (12V+) -> Not Connected (or verify if needed for your specific setup – usually not needed for basic diagnostics with IAWDiag/JPDiag)
Note: Some Fiat OBD cables might have pin 15 connected to the L-line (FIAT pin 1) and pins 4 & 5 bridged for ground. While these can work, always double-check the wiring against the correct scheme to be safe. If you are unsure, it is best to consult wiring diagrams specific to your Vespa model and the diagnostic software you intend to use.
Setting Up Your Vespa Diagnostic Software: Installation and Testing
Once you have all the necessary hardware, it’s time to set up the software component of your Vespa diagnostic scan tool. We’ll walk through the installation and testing process step-by-step using IAWdiag.
1. Install FTDI Drivers
Before connecting your VAG KKL cable to your computer, install the FTDI drivers. Do not use the drivers that might come with the cable on a CD. Always download the latest drivers directly from the FTDI website to ensure compatibility and security.
- For Windows XP/Vista (Version 2.08.24): https://ftdichip.com/drivers/d2xx-drivers/
- For Windows 7 and Higher (Version 2.12.28 or later): https://ftdichip.com/drivers/d2xx-drivers/
Download and install the appropriate drivers for your operating system.
2. Connect the VAG KKL Cable and Identify the COM Port
After driver installation, connect the VAG KKL cable to your computer via USB. Windows should detect the new hardware and install it automatically using the FTDI drivers you just installed.
Next, you need to identify the COM port assigned to the VAG KKL cable. You can use the “Reassign COM Port Utility” from FTDI to check and, if necessary, change the COM port number. IAWdiag and JPdiag typically work best with lower COM port numbers (e.g., COM1 to COM9).
http://www.ftdichip.com/Support/Utilities/Reassign%20COMNo%20Utility.zip
Run this utility to determine the COM port for your VAG KKL cable. In the example below, the cable is installed on COM9.
Note down the COM port number, as you’ll need it later in IAWdiag.
3. Test the VAG KKL Cable
Before connecting to your Vespa’s ECU, it’s essential to test the VAG KKL cable to ensure it’s functioning correctly. Use the “cable_testc.exe” program for this purpose.
Important: For this test, do NOT connect the diagnostic plug to your Vespa. Only connect the crocodile clips of the Fiat OBD cable to a 12V power source (like your Vespa’s battery – red clamp to positive terminal first, then black to negative).
Run the “AdapterTest” program, enter the COM port number you identified earlier, and click “connect.”
If both Test 1 and Test 2 are successful, your VAG KKL cable is working correctly. Press “disconnect.”
Alternatively, you can use another test program called “AdapterTest_V1.01.zip” from the GuzziDiag website:
http://www.von-der-salierburg.de/download/GuzziDiag/AdapterTest_V1.01.zip
Successful tests in AdapterTest V1.01 will look similar to this:
If any test fails, re-check your cable connections, FTDI driver installation, and ensure you are using a VAG KKL cable with a genuine FTDI chip. Do not proceed to connect to your ECU if the cable tests fail, as it could indicate a faulty cable and risk damaging your Vespa’s electronics.
Connecting to Your Vespa ECU with IAWdiag
With a tested and working VAG KKL cable and correctly wired Fiat OBD adapter, you are now ready to connect to your Vespa’s ECU using IAWdiag.
- Connect the Fiat OBD cable to your Vespa’s diagnostic connector. The location of this connector varies slightly depending on your Vespa model, but it’s typically found under the seat or in the glovebox. Consult your Vespa’s service manual for the exact location if needed.
- Launch IAWdiag.
- Configure IAWdiag Settings: In IAWdiag, select your preferred language, the COM port number you identified for your VAG KKL cable, and the correct ECU type for your Vespa model.
- Connect to the ECU: In IAWdiag, go to “File” -> “Connect.” Follow any on-screen instructions.
Once successfully connected, you should see ECU data displayed in the bottom left corner of the IAWdiag window.
Now you have access to a wealth of diagnostic information! You can:
- Monitor real-time parameters: View live data from various sensors on your Vespa engine.
- Read fault codes: Identify and understand any stored error codes within the ECU, pinpointing potential issues.
- Perform static tests: Activate components like injectors or relays for testing purposes.
- Run engine diagnostics while the engine is running: Gather even more data by monitoring parameters while your Vespa engine is operating.
Important Note: Avoid Performing a TPS Reset. Modern Vespa ECUs are pre-calibrated at the factory, and performing a Throttle Position Sensor (TPS) reset is generally not recommended and can cause issues.
Exploring IAWdiag Features: Screenshots and Examples
IAWdiag offers a user-friendly interface for navigating and utilizing its diagnostic capabilities. Here are a few screenshots illustrating different aspects of the software:
Exiting IAWdiag Safely
When you are finished with your diagnostics, and if your engine is running, use the Vespa’s kill switch to turn off the engine. Then, in IAWdiag, go to “File” -> “Disconnect” and follow the on-screen prompts to safely disconnect from the ECU.
Beyond Basic Diagnostics: ECU Mapping and Tuning
For advanced users, the creator of IAWdiag also offers additional programs: IAWMIU3GReader, IAWMIU3GWriter, and IAWMIU3GEEPROMTool. These tools provide the capability to read and write to your Vespa’s MIU ECU, potentially allowing for custom mapping and performance tuning.
These programs are also available on the same download page as IAWdiag:
http://www.von-der-salierburg.de/download/GuzziDiag/
Caution: ECU mapping and tuning are complex procedures that should only be attempted by experienced individuals with a thorough understanding of engine management systems. Incorrect modifications can damage your engine.
JPDiag: Another Excellent Vespa Diagnostic Software Option
JPDiag (http://jpdiag.akress.com) is a highly capable alternative to IAWdiag and is also compatible with the same Vespa ECUs and hardware described in this guide. The setup and connection process are very similar.
Here’s a quick guide to getting started with JPDiag:
- Install JPDiag following the instructions on their website.
- Connect Hardware: Connect the VAG KKL cable, Fiat OBD cable, and to your Vespa as described earlier.
- Launch JPDiag and Select Cable Type: Choose “Galletto Cable” if you are using the recommended FTDI-based VAG KKL cable.
- Connect to ECU: Press the lower radio button next to “connect” and then press “connect.”
Once connected, JPDiag will display ECU information.
License Activation for JPDiag: To unlock the full features of JPDiag, you will need a free license. Click the blue “copy” button in JPDiag. This will open your web browser and take you to the JPDiag license request page. Enter your scooter type and email address to receive your license file. Copy the “cle.lic” file into the JPDiag installation directory (usually c:program_filesjpdiag). Restart JPDiag to activate your license.
JPDiag offers a similar range of diagnostic features as IAWdiag, with a slightly different user interface.
Further Resources: Magneti Marelli MIU G3 ECU Information
For those seeking deeper technical understanding of the Magneti Marelli MIU G3 ECU, this PDF document provides valuable information:
Magneti Marelli MIU G3 Information.pdf
While primarily written for single and twin-cylinder bikes like the Moto Guzzi V7, the fundamental principles of the MIU ECU are consistent across applications, making this document a useful reference for Vespa owners.
Conclusion: Empowering Vespa Owners with DIY Diagnostics
By following this guide, you can create your own Vespa diagnostic scan tool setup at home, empowering you to understand and address issues with your modern, fuel-injected Vespa. Using software like IAWdiag and JPdiag, along with readily available and affordable hardware, you can gain valuable insights into your scooter’s engine management system, potentially saving time and money on professional mechanic visits. Embrace the power of DIY diagnostics and enjoy a deeper connection with your Vespa!