
If your scan tool isn’t communicating with your 2007 Saturn Aura, you’re not alone. This is a common issue, and there are several potential causes. This article will guide you through troubleshooting steps to help pinpoint the problem.
Understanding the OBD-II Port
The OBD-II (On-Board Diagnostics) port is the gateway to your car’s computer system. It allows a scan tool to communicate with the various modules and retrieve diagnostic trouble codes (DTCs). A malfunctioning port can prevent proper diagnosis.
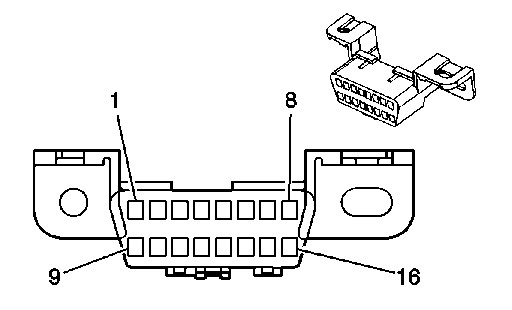
OBD-II Port Pin Configuration
Each pin within the OBD-II port has a specific function:
OBD-II Pin Functions
Common Causes of Communication Failure
Several factors can disrupt communication between the scan tool and the 2007 Saturn Aura:
Pin Connection Issues
Loose or damaged pins within the OBD-II port are a frequent culprit. A pin might be pushed back, preventing contact with the scan tool connector.
Wiring Problems
Damaged or corroded wiring related to crucial communication lines, such as battery voltage, high-speed and low-speed GMLAN (General Motors Local Area Network), Class 2 Serial Data, or ground, can interrupt the signal flow.
Faulty Scan Tool
A malfunctioning scan tool, a blown fuse related to the OBD-II system, or using an incompatible scan tool can also lead to communication errors.
Troubleshooting Steps
-
Visual Inspection: Carefully examine the OBD-II port using a flashlight. Look for bent, pushed back, or damaged pins. Compare each pin to ensure they are aligned correctly.
-
Pin Adjustment: If a pin is pushed back, gently try to reposition it. Access the back of the connector and carefully adjust the wire connected to the affected pin. Never insert anything into the socket to pull it forward; this can cause damage.
-
Check Scan Tool: Inspect the scan tool’s connector for bent or damaged pins. Gently straighten any bent pins. Ensure the scan tool is powered on and functioning correctly. Try the scan tool on a different vehicle to rule out a tool malfunction.
-
Verify Ground Connections: Using a multimeter, check the continuity between the ground pins in the OBD-II port and a known good ground point on the vehicle chassis.
-
Fuse Check: Locate and inspect the fuse related to the OBD-II system. Consult your owner’s manual for the fuse location and amperage. Replace any blown fuses with the correct rating.
Seeking Professional Help
If these steps don’t resolve the issue, it’s likely a more complex problem requiring professional diagnosis. A qualified mechanic can use advanced diagnostic equipment to pinpoint the cause of the communication failure. They can test individual circuits and communication networks to identify the faulty component.