The Avast Boot-Time Scan is a powerful, yet often overlooked, feature within Avast Antivirus, designed for deep-level malware detection and removal. Unlike regular scans that operate within your running operating system, Boot-Time Scan works before Windows fully loads, targeting threats that might be hidden or active during normal operation. This makes it especially effective against persistent and deeply embedded malware strains that are difficult to eradicate through standard scans.
This guide provides an in-depth look at the Avast Boot-Time Scan tool, explaining how to configure it for optimal threat detection and how to effectively utilize it to safeguard your system. While this article focuses on the Boot-Time Scan in standard Avast Antivirus, users of Avast One can find specific instructions in Run a Boot-Time Scan in Avast One.
Configuring Threat Responses for Boot-Time Scans
Before scheduling a Boot-Time Scan, it’s crucial to define how Avast should handle any threats it detects. You can pre-set automatic actions, or opt for manual mode where you decide the fate of each threat during the scan itself. Setting up automatic actions can streamline the process, but understanding each option is important to ensure the safety and stability of your system.
Here’s how to configure threat responses for Boot-Time Scan:
-
Open Avast Antivirus: Locate the Avast Antivirus icon on your system tray and open the application. Alternatively, you can find it in your Windows Start Menu.
-
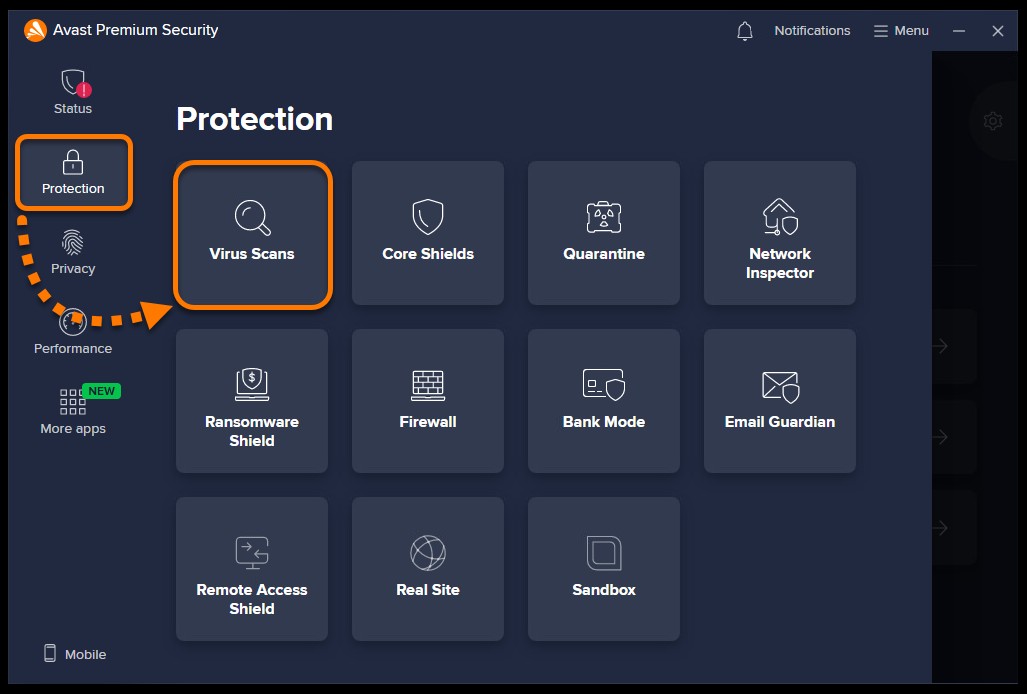
Access Virus Scans Settings: Navigate to the “Protection” section, and then click on “Virus Scans”.
-
Open Scan Settings: On the Virus Scans screen, look for the Settings icon (gear icon) typically located on the right side, and click it.
-
Navigate to Boot-Time Scan Settings: In the Scan settings menu, select the “Boot-Time Scan” tab to access the specific configurations for this scan type.
-
Choose Automatic Actions: Under “Automatic actions during scans,” you’ll see a dropdown menu with the following options:
- Fix automatically (recommended): This is the default and generally recommended setting. Avast will attempt to repair infected files. If repair isn’t possible, it will move the file to Quarantine. If neither repair nor quarantine is feasible, the file will be deleted. This option provides a balance of automation and threat neutralization.
- Move to Quarantine: Select this if you prefer a less aggressive automatic response. Detected files will be isolated in Avast’s Quarantine, preventing them from causing harm, but allowing you to review them later before permanent deletion. Learn more about Quarantine.
- Delete: This is the most aggressive option. Avast will immediately and permanently delete any detected files. Use this with caution, especially if you are not confident in identifying false positives.
- Do nothing – Manual mode (default): If you choose this, Avast will simply report detected threats during the Boot-Time Scan and prompt you to decide on an action for each. This provides maximum control but requires active participation during the scan process.
Choosing the right automatic action depends on your comfort level and technical expertise. For most users, “Fix automatically” provides a good balance of security and convenience. However, if you are concerned about potential false positives or prefer to review detected items, “Move to Quarantine” or “Manual mode” might be more suitable.
Important Caution: Be aware that while Avast Boot-Time Scan is designed to be safe, setting automatic actions, especially “Delete,” carries a small risk. In rare cases of false positives, a critical system file might be misidentified as malware. Avast has safeguards to minimize this, but it’s a factor to consider when configuring these settings.
Scheduling and Running a Boot-Time Scan
Once you’ve configured how Avast should handle threats, scheduling and running a Boot-Time Scan is a straightforward process. It requires a system restart, as the scan operates outside of the active operating system environment.
Follow these steps to initiate a Boot-Time Scan:
-
Open Avast Antivirus: As before, start by opening the Avast Antivirus application from your system tray or Start Menu.
-
Access Boot-Time Scan: Navigate to “Protection” -> “Virus Scans”.
-
Select Boot-Time Scan Tile: On the Virus Scans screen, locate and click on the “Boot-Time Scan” tile. This tile is specifically for initiating this type of scan.
-
Prepare the Scan: Click the “Prepare scan” button. This action schedules the Boot-Time Scan to run the next time your computer restarts.
-
Restart Your Computer: Click “Restart now” to immediately reboot your PC. The Boot-Time Scan will commence during the startup process.
-
Monitor the Scan Progress: After restarting, you will see a blue Avast Boot-Time Scan progress screen appear before Windows loads. This screen displays the scan’s progress. The duration can vary from a few minutes to longer, depending on your system’s speed and the number of files being scanned.
- Skipping the Scan: If you need to skip the Boot-Time Scan for any reason during startup, press the
Esckey on your keyboard while the progress screen is visible.
- Skipping the Scan: If you need to skip the Boot-Time Scan for any reason during startup, press the
-
Handle Detected Threats: Once the scan completes, Avast will apply the automatic actions you configured earlier. If you selected “Manual mode”, you will be prompted to decide how to handle each detected threat. In manual mode, you’ll see a list of threats, and you can tick checkboxes next to them and choose “Resolve all” or “Resolve selected”.
After the scan and threat resolution process is complete, your computer will continue to boot into Windows normally.
Advanced Boot-Time Scan Settings
For users who want more granular control over the Boot-Time Scan, Avast provides several advanced settings that can be customized. These settings allow you to specify what types of files and programs are scanned, and to fine-tune the sensitivity of the scan.
To access and adjust these advanced settings:
-
Open Avast Antivirus and navigate to “Protection” -> “Virus Scans” -> Settings (gear icon) -> “Boot-Time Scan” tab, just as you did when configuring threat responses.
-
Customize Scan Parameters: Within the Boot-Time Scan settings tab, you can modify the following:
- Notify me about potentially unwanted programs: Enabling this option makes the Boot-Time Scan look for Potentially Unwanted Programs (PUPs). PUPs are often bundled with legitimate software and can perform unwanted actions, like displaying excessive ads or changing browser settings. It’s generally recommended to keep this option enabled.
- Scan for Tools: This setting allows you to choose whether to detect or ignore “Tools” like cryptocurrency miners and key generators. These tools are not always malware, but can be used for malicious purposes or installed without your explicit consent. You can choose to detect them based on your security preferences.
- Unpack archive files: When enabled, Avast will unpack and scan the contents of compressed files (like ZIP, RAR, etc.). This is crucial for detecting malware hidden within archives. Disabling this option speeds up the scan but reduces its thoroughness. Keeping it enabled is best for maximum security.
- Parts of your PC to scan: You can select “All hard disks” to scan your entire system, or “System drive” to scan only the drive where your operating system is installed. Scanning all hard disks provides a more comprehensive check, while scanning only the system drive is faster but less thorough. For a Boot-Time Scan, “All hard disks” is generally advisable for a deep clean.
- Auto start programs: This option allows Avast to specifically scan programs that are configured to launch automatically when you start your computer. Malware often uses auto-start mechanisms to ensure persistence. Enabling this enhances the scan’s ability to detect such threats.
- Automatic actions during scans: This section, as discussed earlier, allows you to re-configure the automatic actions Avast takes when threats are detected.
By customizing these advanced settings, you can tailor the Avast Boot-Time Scan to your specific needs and risk tolerance, achieving a balance between scan speed and thoroughness.
Further Resources
For more detailed information about virus scans and security features in Avast Antivirus, you can refer to the following resources:
- [Avast Premium Security](URL to Avast Premium Security page)
- [Avast Free Antivirus](URL to Avast Free Antivirus page)
- Running Boot-Time Scan in Safe Mode
By understanding and utilizing the Avast Boot-Time Scan tool effectively, you can significantly enhance your system’s defenses against deeply rooted malware and ensure a safer computing experience.