Malware can be deeply embedded within your system, making it difficult for regular antivirus scans to detect and remove them once your operating system is up and running. This is where the Avast Boot Time Scan Tool becomes invaluable. As part of Avast Antivirus, this advanced feature allows you to scan for and eliminate stubborn malware threats before Windows even starts, ensuring a cleaner and more secure system. This guide will walk you through everything you need to know about using the Avast Boot Time Scan tool effectively to safeguard your computer.
Understanding and Managing Threat Responses in Avast Boot Time Scan
Before scheduling a Boot Time Scan, it’s crucial to configure how Avast should handle any threats it detects. You can pre-define automatic actions, or choose to manually decide the fate of each threat during the scan itself. Setting up automatic actions beforehand streamlines the process and ensures immediate responses to detected malware.
Here’s how to manage threat responses for Boot Time Scan:
-
Open your Avast Antivirus interface. You can usually find the Avast icon in your system tray and double-click it to open the main application window.
-
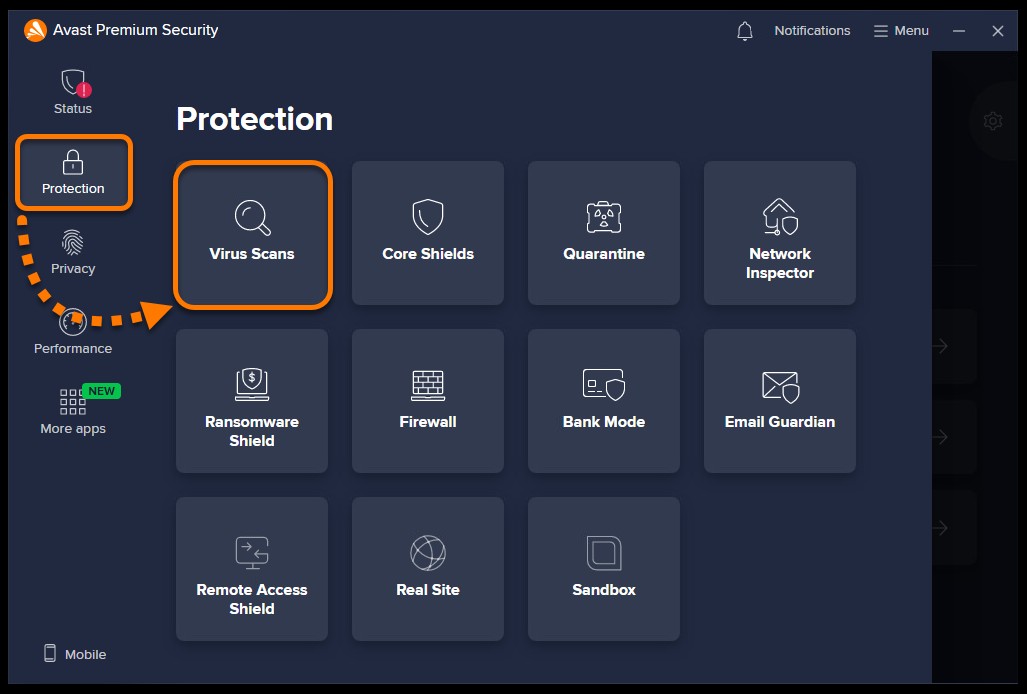
Navigate to Protection and then select Virus Scans. This section is your central hub for all types of scans within Avast.
-
Click on the Settings icon, represented by a gear icon, typically located on the right side of the Virus Scans screen. This will take you to the scan settings.
-
Select the Boot-Time Scan tab within the settings menu. This dedicated tab contains all customizable options specific to Boot Time Scans.
-
Under Automatic actions during scans, you’ll find a dropdown menu. Choose your preferred automatic action from the following options:
- Fix automatically (recommended): Avast will attempt to repair the infected file. If repair isn’t possible, it will move the file to the Quarantine for isolation. As a last resort, if neither repair nor quarantine is possible, the file will be deleted. This is generally the best option for most users as it provides a hands-off approach to threat resolution.
- Move to Quarantine: This option instructs Avast to immediately move any detected threat to the Quarantine, a safe isolated space where the file cannot harm your system. You can review quarantined files later.
- Delete: Choose this option if you want Avast to permanently delete any detected malware immediately. Use with caution, especially if you are unsure about potential false positives.
- Do nothing – Manual mode (default): In this mode, Avast will detect threats during the Boot Time Scan but will not take any automatic action. You will be prompted to choose an action for each threat during the scan itself. This gives you maximum control but requires active participation during the boot scan process.
It’s generally recommended to use the Fix automatically setting for most users. However, if you are technically inclined and prefer to review each detected item, the Manual mode provides that granular control. Be mindful when setting automatic actions like ‘Delete’, as false positives, though rare, can occur. Avast implements safeguards to minimize false positives, but caution is always advised when dealing with automatic file deletion.
How to Run an Avast Boot-Time Scan
Once you have configured your preferred threat responses, running a Boot Time Scan is a straightforward process. It requires scheduling the scan to occur the next time your computer restarts.
Follow these steps to schedule and run a Boot-Time Scan:
-
Open Avast Antivirus and go to Protection -> Virus Scans, just as you did for managing threat responses.
-
Locate and click on the Boot-Time Scan tile. This tile is specifically designed to initiate the scheduling of a boot-time scan.
-
Click the Prepare scan button. This action schedules the Boot Time Scan to run on the next system restart.
-
Click Restart now to immediately restart your PC. The Boot Time Scan will commence during the startup process.
-
As your computer restarts, you will see a Boot-Time Scan progress screen displayed before Windows loads. This screen shows the scan’s progress. The duration of the scan can vary depending on your system’s speed and the number of files to be scanned, generally taking a few minutes. If you need to skip the scan for any reason, you can press the
Esckey on your keyboard during this phase. -
Once the scan detects any threats, Avast Antivirus will apply the automatic action you configured earlier. If you selected manual mode, you’ll be prompted to decide on the action for each detected threat. In manual mode, you can tick the boxes next to the threats and choose Resolve all or Resolve selected to apply your chosen actions.
After the Boot Time Scan completes its process and handles any detected threats, your Windows operating system will start up normally.
Advanced Settings: Customizing Your Avast Boot-Time Scan
For users who want more control over the Boot Time Scan process, Avast provides several advanced settings that allow for deeper customization. These settings let you fine-tune what the scan looks for and how it behaves.
To access and adjust these advanced Boot Time Scan settings:
-
Go to Protection -> Virus Scans in your Avast Antivirus interface.
-
Click the Settings (gear) icon on the Virus Scans screen to open the settings panel.
-
Select the Boot-Time Scan tab to access the specific settings for this scan type.
-
Within the Boot-Time Scan settings, you can configure the following parameters:
- Notify me about potentially unwanted programs (PUPs): Enable this option to have Boot Time Scan detect and report programs that might be bundled with other software and perform unwanted actions. PUPs are not always malicious but can be intrusive.
- Scan for Tools: This setting lets you choose whether to detect or ignore “Tools” like cryptocurrency miners and key generators. These tools are often used for illegitimate purposes and may be considered threats.
- Unpack archive files: When enabled, Avast will unpack and scan compressed files (like ZIP, RAR) during the Boot Time Scan. This is recommended for thorough scanning as malware can hide within archives.
- Parts of your PC to scan: You can specify the scan area to be either All hard disks or just the System drive. Scanning all hard disks provides a more comprehensive check, while scanning only the system drive is faster but less thorough.
- Auto start programs: Enabling this allows Avast to specifically scan programs that are set to launch automatically when your computer starts. This is beneficial for catching malware that might be configured to run at startup.
- Automatic actions during scans: This section allows you to revisit and re-configure the automatic actions for detected threats, as discussed earlier.
By customizing these settings, you can tailor the Avast Boot Time Scan tool to meet your specific security needs and preferences, ensuring a more effective and targeted malware detection process.
Conclusion: Leveraging Avast Boot Time Scan for Enhanced Security
The Avast Boot Time Scan tool is a powerful asset in your cybersecurity toolkit. It provides a crucial layer of defense by targeting malware that hides deep within your system, becoming active even before your operating system fully loads. By understanding how to configure threat responses, run scans, and adjust advanced settings, you can effectively utilize this tool to maintain a clean, secure, and high-performing computer. Regular use of Boot Time Scan, especially when you suspect a deep infection, can significantly enhance your overall protection against persistent and stealthy malware threats.
For further information about scans in Avast Antivirus, you can refer to the official Avast support resources for Avast Premium Security and Avast Free Antivirus on Windows.
Updated on: 12/11/24