
When upgrading your Volkswagen with aftermarket features using a VAG-COM diagnostic cable, correctly installing the VCDS software is crucial. A key step often overlooked is leaving the default installation path untouched: C:Ross-TechVCDS. This article outlines the importance of this step and provides a comprehensive guide to installing and using VCDS software with your VAG-COM cable.
Most VAG-COM cables available online are not official Ross-Tech products. These unofficial cables often function correctly but may not support software updates. Purchasing the latest version available is recommended. The version number (e.g., 17.1.3) indicates the year and month of release, followed by the revision number. Ensure compatibility with your vehicle’s year of manufacture.
Installing VCDS Software: Why the Default Path Matters
The VCDS software installation process is straightforward, but one crucial step is often overlooked: leaving the default installation path as C:Ross-TechVCDS. Changing this path can lead to communication errors between the software and the VAG-COM cable, rendering the cable useless. The software is designed to interact with drivers and files located within this specific directory structure. Altering it can disrupt this interaction and prevent the software from functioning correctly.
Here’s a step-by-step guide for correct installation:
Step 1: Software Installation
- Crucially: Do not connect the VAG-COM cable to your computer yet. Premature connection can lead to driver conflicts.
- Install the VCDS software from the provided mini-CD. The installer file is usually named “VCDS-Release-XX.X.X-Installer.exe” (where XX.X.X represents the version number).
- Leave the original installation path: C:Ross-TechVCDS. This is paramount for proper functionality.
- The installer will also install the necessary drivers for the VAG-COM cable. Proceed through the driver installation prompts by clicking “Next.”
- Restart your computer after the software installation completes to ensure all changes are applied.
 VCDS Software Installation
Step 2: Connecting the VAG-COM Cable
- Disconnect from the internet and disable WiFi. This prevents potential conflicts with the software activation process.
- Plug the VAG-COM cable into any available USB port on your computer.
- Allow Windows to automatically install any required drivers. If the drivers were installed correctly during the software installation, this step might be skipped automatically.
Step 3: Launching VCDS and Testing the Connection
- Important: Connect the VAG-COM cable to both your computer and your car before launching the VCDS software. Ensure internet/WiFi remains off.
- Locate the OBD-II port in your car, typically under the steering wheel or near the pedals.
- Turn on your car’s ignition (engine running or not is usually fine).
- Launch the VCDS software.
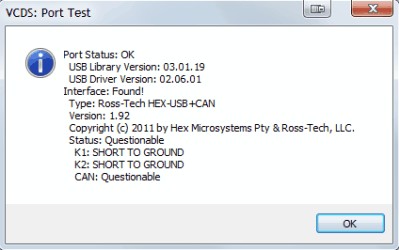
- Navigate to: Options -> Test. The interface should be set to “USB.”
- A successful connection will display “Interface Found.” Click “Save.”
Step 4: Using VCDS – Basic Navigation
The VCDS software allows access to various control modules in your vehicle. Each module is numbered (e.g., 09 – Central Electronics). Within each module are Basic and Advanced Functions, also numbered. Modifications are made by accessing these functions.
Warning: Modifying vehicle settings can have unintended consequences. Exercise caution, research thoroughly, and back up existing settings before making changes. This article does not provide instructions for specific modifications. Refer to official Ross-Tech documentation and reputable forums for detailed guidance.
Never update the pirated software, doing so will brick your cable. Always back up your original settings before making any modifications. Proceed with caution and at your own risk. This article and the author are not responsible for any damage to your vehicle.