Scanning your vehicle with VCDS (Vag-Com Diagnostic System) is a powerful way to diagnose and troubleshoot potential issues. This guide provides a step-by-step walkthrough of the process, explaining key features and functionalities to help you effectively Scan With Vcds.
Understanding VCDS and Vehicle Compatibility
Before you begin to scan with VCDS, it’s crucial to understand how it works and ensure compatibility with your vehicle. VCDS interacts with your car’s control modules, retrieving vital information such as part numbers, component numbers, software coding, workshop information system (WSC) codes, and most importantly, fault codes.
The first step involves selecting the correct Chassis Type. This ensures VCDS only scans for modules relevant to your specific vehicle model. The Chassis Type is often found in the 7th and 8th digits of your Vehicle Identification Number (VIN). For instance, a VIN WAUZZZ4F36N111022 corresponds to a “4F, Audi A6 C6” chassis. Use the search function within VCDS to quickly find your Chassis Type or consult the Ross-Tech Vehicle Application Charts for assistance.
For newer, fully CAN-based vehicles, selecting “Auto Detect (CAN Only)” allows VCDS to automatically identify and scan the installed modules, significantly speeding up the process.
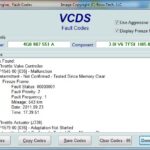
Customizing Your Scan with VCDS
VCDS offers customization options to tailor the scan to your needs. The “MyAutoScan.TXT” file allows you to create a custom scan profile for your vehicle, defining specific modules to target.
The “UDS Aggressive Mode,” enabled by default, instructs VCDS to retrieve all possible fault codes, including those not typically shown by factory scan tools. Disabling this option aligns the scan results more closely with a factory tool’s “Self Diagnostics” mode.
Enabling “Display Freeze Frame Data” includes valuable contextual information about fault codes, such as operating conditions at the time of occurrence. While not all modules support this feature, it’s generally beneficial to leave it enabled.
Initiating and Interpreting the Scan with VCDS
Clicking the “Start” button initiates the Auto-Scan. This process can take several minutes as VCDS cycles through each controller, accessing “Open Controller” and “Fault Codes” screens. The scan results display hardware and software part numbers, ROD files (for UDS modules), and Label Files. Symbols preceding Label Files indicate the type of coding available for the module:
*: Experimental Coding.: Coding from the Label File|: Both Coding from the Label File and Experimental Coding
Double-clicking on any module highlighted in RED indicates the presence of fault codes and opens the “Fault Codes” screen for that module. You can then clear the codes from this screen.
Additional Features for Scanning with VCDS
The “Gateway Installation List” quickly identifies installed modules and their status, highlighting those with fault codes in RED. “Auto-Refresh” provides real-time updates on fault code occurrences. The “Clear All DTCs” function, available with HEX Interfaces, allows for efficient clearing of fault codes across multiple modules. VCDS also automatically retrieves the vehicle’s VIN and displays engine codes and component identifiers.
Saving and Managing Scan Results
After scanning with VCDS, several options are available for managing the results:
- Copy: Copies the results to the clipboard for pasting into other applications.
- Print: Prints the scan results.
- Save: Saves the results to a file in the VCDSLogs directory. VCDS also automatically saves a copy to the Scans folder (typically C:Ross-TechVCDSScans).
- Clear: Clears the displayed results without erasing fault codes from the controllers.
By understanding these features and following this guide, you can effectively utilize VCDS to scan your vehicle, diagnose problems, and keep your car running smoothly.