
This comprehensive guide provides step-by-step instructions on how to download, install, and troubleshoot the VAG KKL 409.1 USB cable and VCDS software on Windows for vehicle diagnostics. While the VAG KKL 409.1 offers a budget-friendly option, it’s crucial to understand its limitations before proceeding.
Understanding VAG KKL 409.1 Limitations
The VAG KKL 409.1 cable, while functional, has significant limitations. Its compatibility is restricted to older vehicles (generally pre-2004) and lacks support for newer CAN-BUS systems. Furthermore, the free VCDS-Lite software requires a paid upgrade to unlock full functionality. For a more comprehensive and future-proof solution, consider a newer VAG-COM cable with the full, unlocked VCDS software.
Installing VAG-COM 409.1 Drivers on Windows
Important: Do not connect the cable to your computer until instructed.
Driver Installation for Windows Vista, 7, 8, 8.1, and 10
- Download the VAG-COM Driver Pack 1.
- Unzip the downloaded file.
- Locate and double-click “Install.exe” to initiate the driver installation.
- After installation, connect the VAG KKL 409.1 cable to your computer’s USB port. Windows should automatically complete the setup.
Driver Installation for Windows XP
- Download the VAG-COM Driver Pack 1.
- Unzip the downloaded file.
- Double-click “Install.exe.”
- Connect the cable to your computer. The “Found New Hardware Wizard” will appear.
- Select “Yes” to allow Windows to search for software online.
- Choose “Install the software automatically.” Click “Finish” upon completion.
- Repeat steps 5 and 6 for the second driver installation prompted by the wizard.
Troubleshooting Driver Installation Issues
If the driver installation fails using Driver Pack 1, try the following:
- Download VAG-COM Driver Pack 2.
- Extract the files to a folder on your computer.
- Connect the cable to your computer.
- Open Device Manager (Control Panel > System > Device Manager or Control Panel > System > Hardware > Device Manager for Windows XP).
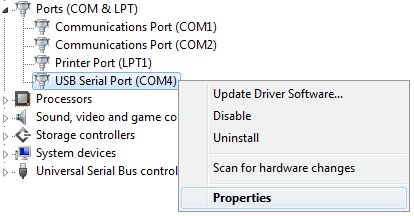
- Locate the “USB Serial Port” under “Other devices” or “Ports (COM & LPT).” It may have a yellow exclamation mark.
- Right-click on “USB Serial Port” and select “Update Driver Software.”
- Browse to the folder where you extracted Driver Pack 2 and let Windows install the driver.
Identifying the COM Port Number
- Open Device Manager.
- Expand “Ports (COM & LPT)” or “Other devices” to find “USB Serial Port.” Note the assigned COM port number. Ideally, it should be between 1 and 4.
Changing the COM Port Number (If Necessary)
If the COM port number is above 4:
- Right-click on “USB Serial Port” in Device Manager and select “Properties.”
- Navigate to “Port Settings” > “Advanced.”
- Under “COM Port Number,” select a number between 1 and 4. Click “OK.”
Testing the VAG KKL 409.1 Connection
- Ensure the cable is connected to the computer and the car’s ignition is ON.
- Open VCDS-Lite.
- Click “Options” and select the correct COM port number from the dropdown menu.
- Click “Test.” A successful connection will display “Interface Status: Found!”
Troubleshooting Connection Issues
If the test fails:
- Ensure no other software or devices are using the same COM port.
- Remember that the VAG KKL 409.1 is incompatible with CAN-BUS systems.
- Try different COM ports (1-4) in VCDS-Lite.
- Verify the driver is correctly installed.
- Consider reinstalling VCDS-Lite after removing any previous versions and the “C:Ross-Tech” directory. Try adjusting the “Start Baud” in VCDS-Lite options to 9600, 4800, or 1200 if you encounter “Can’t Synch Baud Rate” errors. Remember to cycle the ignition OFF and ON after each attempt. The VAG KKL 409.1 supports Audi, Volkswagen, Skoda, and Seat vehicles. Other brands may only work for generic OBD-II functions.
This guide provides a comprehensive overview of using the VAG KKL 409.1 cable. Remember its limitations and consider a more modern solution for broader vehicle compatibility and functionality.