
This guide provides a step-by-step walkthrough on how to install a Vcds 18.2 Cable and software on your computer. VCDS (VAG-COM Diagnostic System) is a powerful diagnostic tool for Volkswagen, Audi, Seat, and Skoda vehicles. Following these instructions will ensure a successful installation and allow you to start diagnosing and troubleshooting your car.
Prerequisites for VCDS 18.2 Installation
Before you begin, make sure your system meets the following requirements:
- Operating System: Windows XP or later. Windows 7, 8, and 10 are preferred. While older operating systems might work, performance may be impacted. For optimal performance, use a system with a 1GHz or faster processor.
- Processor: 500MHz minimum (1GHz or faster recommended).
- USB Port: A functional USB port is required for the VCDS 18.2 cable connection.
- Administrative Privileges: You need administrator privileges to install software on your computer.
VCDS 18.2 Installation Steps
Follow these steps carefully to install the VCDS 18.2 software and drivers:
-
Disconnect the Cable: Important: Do not connect the VCDS 18.2 cable to your computer until instructed.
-
Install the Software: Run the “VCDS-Release-18.2.0-Installer.exe” file. If you’re using a 64-bit Windows system, ensure you select the option to “Install 32-bit EXE on 64-bit System” during the installation process. This is crucial for compatibility.
-
Do Not Launch the Software: After the installation completes successfully, resist the urge to run the VCDS software directly.
-
Copy the Loader: Locate the “VCDSLoader.exe” file (it might be in the same directory as the installer) and copy it to the VCDS installation folder. The default installation path is usually: C:Ross-TechVCDS.
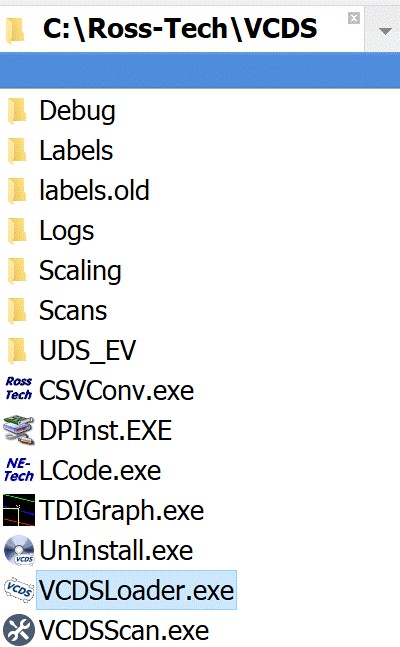 vcds-folder-location
-
Connect the Cable: Now, connect the VCDS 18.2 cable to your computer’s USB port. Allow Windows approximately 20 seconds to automatically install the necessary drivers.
-
Launch with VCDSLoader: Always use the “VCDSLoader.exe” to launch the VCDS software. This ensures proper functionality and activation.
-
Test the Connection: After launching, click on “Options” and then “Test” to verify the connection between the cable and the software. You should see a successful connection status.
-
Registration and Activation: Follow the specific instructions provided by your VCDS 18.2 cable vendor for registering and activating the software. This typically involves generating a request file using the VCDSLoader, sending it to the vendor, and then receiving a license file to activate the software.
Troubleshooting and Tips
- Driver Issues: If Windows doesn’t automatically install the drivers, you might need to manually install them from the CD provided with the cable or download them from the manufacturer’s website.
- Antivirus Interference: Temporarily disable your antivirus software during the installation process as it may sometimes interfere. Remember to re-enable it afterward.
- USB Port Selection: Try a different USB port if you encounter connection problems. Avoid using USB hubs and connect directly to the computer.
Conclusion
Successfully installing your VCDS 18.2 cable and software opens up a world of diagnostic possibilities for your VAG vehicle. By following these instructions and troubleshooting tips, you can confidently use VCDS to diagnose and resolve issues, customize settings, and gain a deeper understanding of your car’s systems. Remember to always launch the software using “VCDSLoader.exe” for continued functionality.