
This comprehensive guide provides step-by-step instructions on how to download, install, and troubleshoot VCDS 409.1 KKL USB cable drivers on Windows 10 for use with VCDS-Lite software. While VCDS 409.1 offers limited functionality compared to newer versions, this guide will help you get it working correctly.
 VCDS 409.1 KKL Cable connected to a laptop
Important Note: VCDS 409.1 has significant limitations. It only supports vehicles manufactured up to 2004 and requires a paid upgrade from the free VCDS-Lite software to access full functionality. Consider a newer VCDS version for broader compatibility and features.
Installing VCDS 409.1 Drivers on Windows 10
Before you begin: Do not connect the VCDS 409.1 cable to your computer until instructed.
-
Download the Drivers: Download the necessary driver pack. You may need to try different driver packs if the first one fails to install. Look for “VAG-COM Driver Pack” online.
-
Install the Drivers:
- Unzip the downloaded driver pack.
- Locate the
Install.exefile within the unzipped folder and double-click to run it. - Follow the on-screen prompts to complete the driver installation.
- Once the installation is finished, connect the VCDS 409.1 cable to a USB port on your computer. Windows should automatically detect and install the necessary drivers.
Identifying the COM Port
After successfully installing the drivers, you need to determine which COM port your computer has assigned to the VCDS 409.1 cable.
-
Open Device Manager:
- Search for “Device Manager” in the Windows search bar and open it.
-
Locate the COM Port:
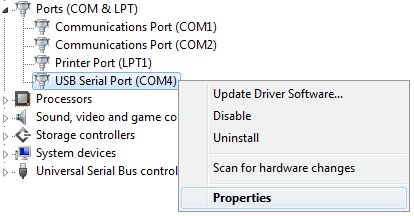
- Expand the “Ports (COM & LPT)” section.
- Look for “USB Serial Port” – this is your VCDS cable. The number after it (e.g., COM3) is your COM port number.
-
Change the COM Port (if necessary): VCDS-Lite often works best with COM ports between 1 and 4. If your assigned port is higher than 4:
- Right-click on “USB Serial Port” and select “Properties”.
- Go to the “Port Settings” tab and click “Advanced”.
- Under “COM Port Number”, select a number between 1 and 4 from the dropdown menu.
- Click “OK” to save the changes.
Testing the VCDS 409.1 Connection
Now it’s time to test if your VCDS 409.1 cable is communicating correctly with your computer and VCDS-Lite software.
-
Launch VCDS-Lite: Open the VCDS-Lite software on your computer.
-
Select the COM Port:
- Click the “Options” button.
- In the “Select COM Port” box, choose the COM port number you identified (or changed) in the previous step.
-
Test the Connection:
- Click the “Test” button. A successful connection will display “Interface Status: Found!”.
You can now connect the cable to your car’s OBD-II port, turn on the ignition, and begin diagnosing!
Troubleshooting
If the test fails (“Interface Status: Not Found!”), try these troubleshooting steps:
- Conflicting Software: Close any other programs that might be using the same COM port or USB resources.
- CAN-BUS Compatibility: VCDS 409.1 doesn’t work with vehicles using the CAN-BUS system (generally models after 2004).
- Ignition: Ensure your car’s ignition is ON.
- Baud Rate: In VCDS-Lite “Options”, try different “Start Baud” rates (9600, 4800, 1200). Cycle the ignition OFF and ON after each attempt.
- Driver Reinstallation: Uninstall and reinstall the drivers, ensuring you’re using a compatible driver pack.
- VCDS Software Conflicts: Uninstall any previous VCDS installations and delete the “C:Ross-Tech” directory before reinstalling VCDS-Lite.
Supported Vehicles: VCDS 409.1 primarily supports Audi, Volkswagen, Skoda, and Seat vehicles. Other brands may work only for basic OBD-II functions. Refer to Ross-Tech’s documentation for detailed compatibility information.