
This comprehensive guide provides step-by-step instructions for installing and troubleshooting the VCDS 409.1 KKL USB cable on Windows 10, enabling you to diagnose your Volkswagen, Audi, Seat, or Skoda vehicle. While VCDS 409.1 offers limited functionality compared to newer versions, this guide will help you maximize its potential.
Installing VCDS 409.1 Drivers on Windows 10
Before connecting the cable, download and install the necessary drivers.
-
Download the Drivers: Download the VAG-COM Driver Pack. You may need to try different driver packs if the first one fails. Common sources include Ross-Tech’s website or FTDI Chip’s website.
-
Install the Drivers:
- Unzip the downloaded driver pack.
- Locate and double-click the “Install.exe” file.
- Follow the on-screen prompts to complete the installation.
-
Connect the Cable: After successful driver installation, connect the VCDS 409.1 cable to your computer’s USB port. Windows should automatically detect and configure the device.
Identifying the COM Port
VCDS software requires the correct COM port number to communicate with the cable.
- Open Device Manager:
- Search for “Device Manager” in the Windows search bar and open it.
-
Locate the COM Port:
- Expand “Ports (COM & LPT)”.
- Identify the “USB Serial Port” associated with the VCDS cable. The COM port number is displayed next to it. It will often appear as “USB Serial Port (COM3)” for example.
-
Adjust COM Port (If Necessary):
- If the COM port number is higher than 4, it’s recommended to change it to a number between 1 and 4 for better compatibility with VCDS-Lite.
- Right-click on “USB Serial Port” and select “Properties”.
- Go to “Port Settings” -> “Advanced”.
- Under “COM Port Number”, select a number between 1 and 4 from the dropdown menu.
- Click “OK” to save the changes.
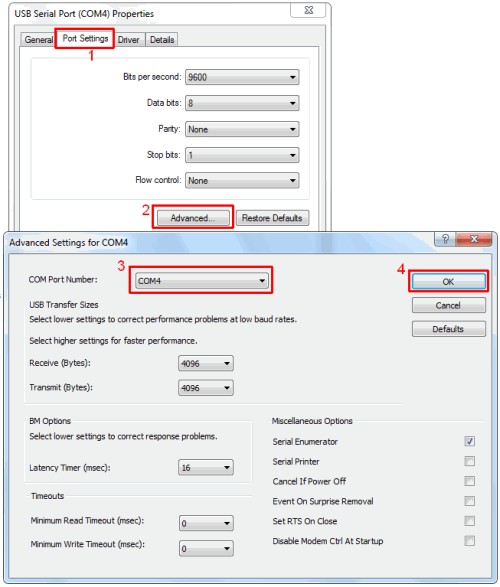 Changing COM Port number in Windows Device Manager
Testing the VCDS 409.1 Cable
-
Launch VCDS-Lite: Open the VCDS-Lite software.
-
Select the COM Port:
- In VCDS-Lite, click “Options”.
- Choose the correct COM port number from the “Select COM Port” dropdown menu. This should match the number identified in Device Manager.
-
Test the Connection:
- Click the “Test” button.
- A successful connection will display “Interface Status: Found!”.
-
Connect to Your Vehicle:
- Connect the other end of the cable to your vehicle’s OBD-II port.
- Turn on the vehicle’s ignition. You are now ready to start diagnosing.
Troubleshooting
If the test fails, try these steps:
- Verify COM Port: Double-check that the correct COM port is selected in VCDS-Lite.
- Check USB Connection: Ensure the cable is securely connected to both the computer and the vehicle.
- Ignition On: Confirm that the vehicle’s ignition is turned on.
- Driver Issues: Reinstall or try alternative drivers if necessary.
- Software Conflicts: Close any other software that might be using the same COM port.
- CAN-BUS Compatibility: Note that VCDS 409.1 does not work on vehicles with a CAN-BUS system (typically models after 2004).
- Baud Rate Adjustment: In VCDS-Lite Options, try adjusting the “Start Baud” to 9600, 4800, or 1200. Cycle the ignition off and on after each attempt.
By following this guide, you can successfully install and use your VCDS 409.1 cable with Windows 10 to diagnose older VW, Audi, Seat, and Skoda vehicles. Remember that VCDS 409.1 has limitations, and upgrading to a newer version might be necessary for full functionality with modern vehicles.