
This comprehensive guide provides step-by-step instructions on how to install the Vcds Lite Cable Driver on various Windows operating systems. A properly installed driver is crucial for establishing communication between your VCDS Lite cable and your vehicle’s onboard diagnostic system.
Important Note: While the VCDS Lite cable and software are functional, their capabilities are limited to older vehicle models (pre-2004). Consider upgrading to the full VCDS system for broader compatibility and functionality. A full VCDS system provides access to all diagnostic features and supports a wider range of vehicle models and years.
Installing the VCDS Lite Cable Driver
Before connecting the cable, download and install the necessary drivers. We recommend using the latest driver package available from Ross-Tech, the official VCDS developer.
Windows Vista, 7, 8, 8.1, and 10
-
Download and Uncompress: Download the VCDS driver package and extract its contents to a folder on your computer. The official Ross-Tech website is the recommended source for the latest drivers.
-
Run the Installer: Locate the “Install.exe” file within the extracted folder and double-click it to initiate the driver installation process. Follow the on-screen prompts to complete the installation.
-
Connect the Cable: Once the installation finishes, connect the VCDS Lite cable to an available USB port on your computer. Windows should automatically detect and configure the device.
Windows XP
-
Download and Uncompress: Download the appropriate VCDS driver package for Windows XP and extract the files. Older driver versions may be required for compatibility with Windows XP.
-
Run the Installer: Double-click “Install.exe” to begin the installation.
-
Connect the Cable: Plug the cable into your computer’s USB port. The “Found New Hardware Wizard” will appear.
-
Windows Update: Choose “Yes” to allow Windows to search for software online.
-
Automatic Installation: Select “Install the software automatically.”
-
Second Driver Installation: Repeat steps 3-5 for the second driver, which the wizard will prompt you to install.
Troubleshooting Driver Installation Issues
If the driver installation fails, try the following:
-
Alternative Driver Package: Download and install an alternative VCDS driver package, often labeled as “CDM.” These drivers are generally more universally compatible.
-
Manual Driver Installation:
- Open Device Manager (search for it in the Control Panel). Device manager provides an interface for managing connected hardware devices.
- Locate the “USB Serial Port” under “Other devices” or “Ports (COM & LPT).” It may appear with a yellow exclamation mark indicating a driver issue.
- Right-click on it and select “Update Driver Software.” This will initiate the driver update process.
- Browse to the folder where you extracted the alternative driver package.
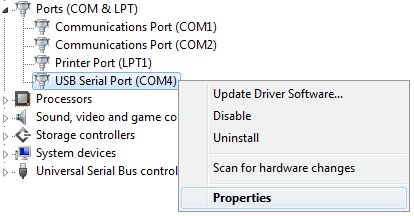 alt text: Screenshot of Windows Device Manager with USB Serial Port highlighted and right-click menu showing Update Driver Software option.
Identifying the COM Port
-
Open Device Manager: Access Device Manager as described in the troubleshooting section.
-
Locate COM Port: Find the “USB Serial Port” and note the associated COM port number (e.g., COM3). This number is essential for configuring the VCDS software.
-
Change COM Port (If Necessary): If the COM port number is above 4, change it to a number between 1 and 4:
- Right-click on “USB Serial Port” and select “Properties.”
- Go to “Port Settings” -> “Advanced.”
- Under “COM Port Number,” select a value between 1 and 4.
Testing the VCDS Lite Cable
-
Launch VCDS-Lite: Open the VCDS-Lite software.
-
Select COM Port: In the “Options” menu, choose the correct COM port identified earlier.
-
Test Connection: Click the “Test” button. A successful test will display “Interface Status: Found!”. This confirms successful communication between the software and the cable.
-
Connect to Vehicle: Connect the cable to your car’s OBD-II port with the ignition turned on. You are now ready to use VCDS-Lite.
If the test fails, review the troubleshooting tips in the original article for potential solutions. Ensure the ignition is on, try different baud rates, and check for conflicting software. Remember to consult the official Ross-Tech documentation for comprehensive troubleshooting and support.