
Keeping your Creader Scan Tool Updated is crucial for optimal performance and access to the latest vehicle diagnostic capabilities. Regular updates ensure compatibility with newer vehicle models, expanded diagnostic functions, and the most recent software improvements. This guide provides a comprehensive walkthrough on how to perform a creader scan tool update, ensuring your device is always ready for accurate and efficient vehicle diagnostics.
Registering Your Creader VII+ Scan Tool
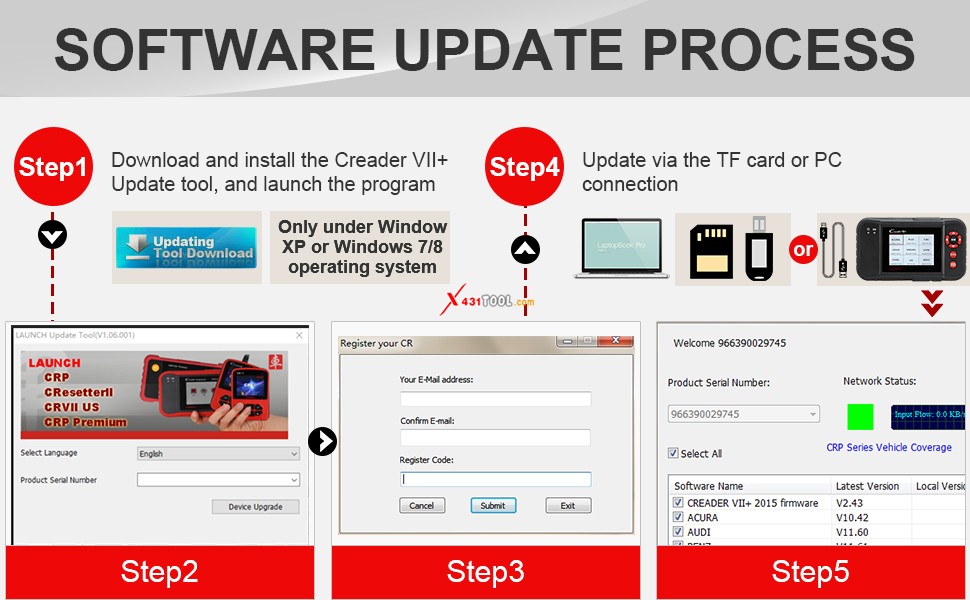
Before you can update your Creader VII+, you’ll need to register your device. This is a straightforward process that links your scan tool to your account, enabling access to updates and support. Here’s how to register your Creader VII+:
-
Visit the Launch Official Website: Open your web browser and navigate to the official Launch website: https://en.cnlaunch.com/.
-
Locate the Login/Register Area: Look for the login or registration link, typically found in the upper right corner of the homepage.
-
Search for Creader VII+: Once on the Launch website, use the search function and enter “Creader VII+”.
Alt: Searching for Creader VII+ on the Launch official website to begin the registration process for your scan tool.
- Select Creader VII+ from Search Results: Click on the Creader VII+ product listing to access the dedicated product page.
Alt: Selecting the Creader VII+ model from the search results on the Launch website, essential for accessing the correct registration portal.
- Find the Download Section: Scroll down the Creader VII+ product page to find the “Download” section. This section contains the necessary software for registration and updates.
Alt: Locating the download section on the Creader VII+ product page, where users can find the update tool and registration software.
- Download and Run the Update Tool: Download the Creader VII+ update tool software, unzip the downloaded file, and run the executable file to install it on your computer.
Alt: Running the downloaded Creader VII+ update tool installer on a computer, a key step in preparing for scan tool registration and software updates.
- Select Language and Enter Serial Number: Launch the update tool, choose your preferred language, and enter the serial number of your Creader VII+. The serial number is typically located on the back of the device.
Alt: Entering the Creader VII+ serial number into the update tool software, a necessary step to identify your specific scan tool for registration.
- Retrieve Registration Code from Your Device:
- Connect your Creader VII+ tool to your computer using a USB cable.
- Power on your Creader VII+ device.
- Navigate to the “Help” menu on your Creader VII+ device.
- Select “Tool Information” and press “OK”.
- Your “Register Code” will be displayed on the screen.
Alt: Connecting the Creader VII+ scan tool to a computer to obtain the registration code, essential for completing the device registration process.
- Complete Registration Information: Return to the update tool on your computer, enter your email address and the “Register Code” you obtained from your Creader VII+, and click “Submit” to finalize the registration.
Alt: Completing the registration form in the update tool by entering email address and registration code, finalizing the Creader VII+ scan tool registration.
Updating Your Creader Scan Tool Software
Once registered, you can proceed with the creader scan tool update. Launch Creader VII+ offers two update methods, with TF card update being the strongly recommended approach for its reliability and speed.
Updating via TF Card (Recommended):
-
Download the Update Tool: Ensure you have downloaded and installed the Creader VII+ Updating tool from the official Launch website as described in the registration steps.
-
Enter Serial Number and Register: Open the update tool, enter your Product Serial Number, and click “Upgrade.” If you haven’t registered, you’ll be prompted to enter your email and “Register Code” (obtained from “Help–Tool Information” on your device).
-
Prepare the TF Card: Safely remove the TF card from your Creader VII+ tool and insert it into the provided USB TF card adapter. Then, insert the adapter into your computer’s USB port.
Alt: Removing the TF card from the Creader VII+ scan tool and inserting it into a card reader, preparing for the software update process.
- Select and Download Updates: Reopen the Creader VII+ Updating tool. Choose the updates you wish to install, or select “Select All” to update everything. Click “Download” to begin the download process to your TF card.
Alt: Downloading the latest car software updates to the TF card using the Creader VII+ update tool, ensuring the scan tool has the most current diagnostic capabilities.
- Reinstall TF Card and Verify Update: Once the download is complete, safely remove the TF card from the adapter and reinsert it into your Creader VII+ device. Reconnect your device to a vehicle or power source. The Creader VII+ should recognize the updated files and complete the update process automatically. Verify the update was successful by checking the software version in the “Tool Information” menu.
 Launch Creader VII+ 4 System
Alt: The Launch Creader VII+ 4 System scan tool, now updated with the latest software, ready for comprehensive vehicle diagnostics.
By following these steps, you can easily perform a creader scan tool update and ensure your Launch Creader VII+ is always operating at its best, providing you with accurate and reliable diagnostic information for a wide range of vehicles. Regular updates are key to maximizing the value of your scan tool and keeping it compatible with the evolving automotive landscape.